Thursday, January 10, 2013

Lemon Angel Torte


Doesn't that look yummy?  It may not be picture perfect, but it will taste like summer on this January day.  This cake was made with store-bought ingredients and went together very quickly.

I love to make things from scratch for several reasons.  1) It is usually cheaper, 2) It is usually healthier, and 3) I like to cook.  However, I am always on the look out for a deal.  If I can pick up ingredients for a semi-homemade meal or dessert, I will do it in a flash.  I got the Angel-food cake on a buy one get one free deal.  This one has been in the freezer.  The lemon curd is from a Jello mix I got on a clearance shelf.


The pudding is cook and serve.  I'm not a fan of instant puddings, but if you like them feel free to use them.  I called my mother when I was cooking the pudding.  A nice chat later and into the refrigerator it went.  I do tend to think instant pudding tastes different than the cook and serve stuff.  Maybe it is because I grew up eating it.  I don't really know, but I don't mind taking the time to cook it.  I have made lemon curd from scratch many times.  It is wonderful, but I didn't have the ingredients on hand to do that today.  My whole outlook is 'make do with what you have'.

So, I cooked and cooled the pudding.  I took the cake out of the freezer and let it defrost a little bit.  It is easier to slice or cube cake when it is still a little bit frozen.  I cut it into 3 pieces and layered the pudding between the layers.


I like to let some of the pudding ooze down the sides.  It always makes my kids say, "OOOOOOOO!"

I don't put pudding on the top, but you can if you like.  I prefer to top it with whipped topping.


The assembly took less than 5 minutes.  My son ran to get his camera because he wanted a picture.  Nothing warms my heart like my son getting excited about the things I make in the kitchen.

If the cake had broken up while cutting it, I would have layered the cake cubes and pudding in a bowl and topped it with the whipped topping.  Then instead of a torte, you have a trifle!  This would be very tasty with fruit too.  I didn't have any today and no one is going to complain.  You can use any type of cake and any type of pudding.  Let your imagination run wild!  

Sunday, January 6, 2013

Fettuccine Alfredo Your Way

I love recipes that are tasty and can easily be modified to suit your tastes and your budget.  Homemade Fettuccine Alfredo is the perfect example.


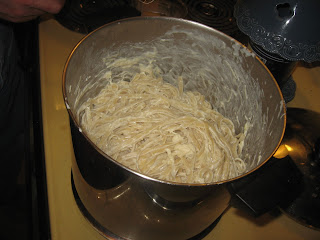
We love to add things to our Fettuccine Alfredo.  Often we add broccoli, sometimes grilled chicken, maybe mushrooms.  It depends on what we have, what we can afford and our mood.  A lot of the time we have it plain.  Our kids love this dish too.  They tend to pick out the mushrooms, but I'm happy to take their discards.  This is not a soupy Alfredo like you often get in restaurants.  This is the real deal.  The kind they used to make right at your table in nice restaurants.  It is just as quick as heating up the soupy stuff from a jar and tastes a million times better.  My husband found this recipe in the New York Times Cookbook.  He has been making it for 20 years.  I am usually in charge of any add-ons.  For the dish above I browned pancetta and mushrooms, and lightly steamed broccoli.

Here are the ingredients for the basic recipe.  We doubled it so we would have lots of left-overs for lunches this week.

1 pound fresh pasta (we always use the dry in a box)
1/4 pound butter (1 stick) cut into 8 pieces
freshly ground pepper to taste
1 cup half-and-half (we often just use milk, but it is better with half-and-half)
1/4 pound grated Parmesan cheese (about 1 cup)
2 large white truffles, sliced (optional)   Very optional.  We have never used them.

I will say the Parmesan cheese makes a big difference.  Buy the most expensive one you can afford.  We have made this with the stuff from a jar right through to Parmigiano-Reggiano.  It will taste best with better quality cheese, but it is good with any.


We bought 1/4 pound of thinly sliced pancetta, which I cut up and browned.  Pancetta is an uncured Italian bacon.  It has a cleaner taste than American bacon, but we have used regular bacon many times.  Then I sliced some white mushrooms and browned them.


I steamed the broccoli while the pasta was boiling and set the add-ons aside.  


Once the pasta was drained my husband went to work.  This method is a bit different, but the result is sublime.  For this recipe you drain the pasta and turn the burner down to low.  Put the drained pasta back into the pan and stir it to dry out.  Then you begin adding the butter.  Add about 1/3 of it and stir until it is melted and coating the pasta.  Repeat two more times.


When the butter is all incorporated, begin adding the cream or milk.  Pour in about 1/3 of it and stir until it is absorbed.  Repeat two more times.  This happens more quickly with cream than with milk.


You can see when it is absorbed.


Next you begin  adding the cheese.  It gets more difficult to stir now because the cheese melts and is sticky.  Add about 1/3 and stir until it is melted and you don't see pieces any more.  Then add some more.  If you add it all at once it will create a big blob that is hard to break up.


It creates a lovely, thick sauce this way and it only takes a few minutes.  Use a rubber spatula to scrape all the yumminess into a serving bowl and add your extras.


Serve with black pepper and extra cheese, if you like.  We usually don't bother with extra cheese, but some people may want more.

I highly recommend putting the pot to soak while you eat.  It will be much easier to clean if you do.

This is such an awesome dish and so impressive to serve to guests.  You can add just about anything you like to it.  Lots of people love grilled shrimp or peas.  I'm not a fan of either, but that is the true beauty of this dish.  You make it your way.  Enjoy!


Thursday, December 20, 2012

Cookies & Cream Fudge

 I love to make goodies for my family and friends during the holidays.  One thing I love to make is fudge.

 (I had to borrow this picture, because my kids ate the fudge before I had a chance to get a picture of the pieces.  The rest of the pictures are mine.)

I'm talking real, old-fashioned fudge.  Not that the quick stuff with sweetened condensed milk and chocolate chips isn't yummy, but it is rather expensive to make.  I can make old-fashioned fudge using ingredients I have on hand this time of year anyway.  I use the recipes from my Fannie Farmer Cookbook.  The instructions in that cookbook are excellent.  Just do what Fannie says.  It takes some time, but it isn't difficult at all.  Don't try it when you are running tight for time.  Pick an evening when you are going to be hanging around the house.  The mixture takes 30 to 45 minutes to cool enough to mix.


This is the grand total of the ingredients needed.  Sugar, cream, vanilla, salt and chopped sandwich cookies.  I buy the store brand and I used 1/3 of the package.  My kids were happy to eat the rest of them.

Equipment is a factor here.  You can't make candy without a candy thermometer.  Well, you can, but you have to know how to test it in water and that can be messy and tricky.  I also wouldn't recommend making fudge without a stand mixer, unless you happen to work out a lot.  You would need to stir the thick mixture for quite a while.  It takes 7 to 10 minutes with the stand mixer.  Ladies managed to do it in the days before modern kitchen equipment, but I bet they had help with the stirring.  That being said, if you have the equipment go ahead and give it a try.  Your family will love you.

Here is the recipe I used:

Opera Fudge

2 cups sugar
1 cup heavy cream
1/8 teaspoon salt
1 teaspoon vanilla

The cookies were my idea.  They aren't listed in Fannie Farmer's Cookbook.

Line an 8 X 8 inch pan with foil and butter thoroughly.


Combine the sugar, cream, and salt in a 3-quart heavy pot, stirring to blend well.  Place over medium heat and, stirring, bring to a boil.  Cover and let boil for 2 to 3 minutes.  Uncover and wash down the sides of the pot with a pastry brush dipped in cold water.  Attach the candy thermometer to the side of the pan and continue to boil over medium heat, without stirring, until the syrup reaches the soft-ball stage (234 degrees F).

Remove the pot to a cooling rack or surface and allow to sit, without stirring, until the temperature reaches lukewarm (110 degrees F).


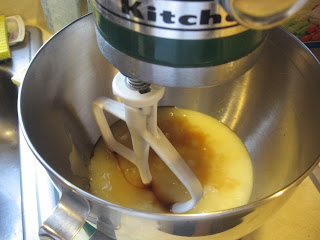
Using a rubber spatula, scrape the mixture in the bowl of a stand mixer.  Add the vanilla and, using the paddle attachment, beat until creamy.  The fudge will thicken and lose it's glossy look.


Add the chopped cookie bits and mix just to combine.


Spread the mixture into the prepared pan.  Cover with a damp paper towel for 30 minutes and then allow to sit and dry a bit.  Score the top and cover tightly.  This fudge tastes better after sitting overnight.  Store in an air tight container.  


Oh my goodness, was this ever yummy!!  I made more to give my nephew.  He loves those Cookies & Cream candy bars.  I think he will love the fudge.  

I also made the Chocolate Fudge from the Fannie Farmer Cookbook.  It follows the same method, but uses a few more ingredients.

1/4 cup cocoa powder or 2 ounces unsweetened cocoa
2 cups sugar
3/4 cup milk
2 tablespoons light corn syrup
2 tablespoons butter, in small pieces
2 teaspoons vanilla

You use the exact same method.  Start by cooking the cocoa, sugar, milk, corn syrup and sugar. This recipe calls for bringing it to a boil over low temperature.  After it reaches 234 degrees, remove it from the heat and drop the butter in.  Do not stir.  Let it cool to 110 degrees.  Put in the mixer and add the vanilla.  Beat until it thickens an loses the glossy look.  

As you can see, fudge isn't difficult.  It just needs time.  When it comes to washing the dishes, let them soak in hot water for a while.  The water will dissolve the sugar and it will be a snap to wash them.

If you order fudge online it costs $11.99 per pound, plus shipping.  Other than the cookies, I just used stuff I already had on hand.  I could have made 3 batches from the bag of cookies.  It tastes just as good and costs far less to make.  Plus you get major points for making something by hand.  


Tuesday, November 20, 2012

Chocolate Souffle


Does the term Souffle scare you a little?  It sure scared me when my husband (boyfriend at the time) told me he would like a Chocolate Souffle for his birthday 20 years ago.  His step-mother always made one for him, and he wanted me to pick up the tradition.  Much to my surprise and delight I found it wasn't difficult at all.  The really nice part is you can do most of the work a day or two ahead of time and assemble it at the last minute before putting it into the oven.  It takes over an hour to bake, so it cooks while you eat.  Souffle needs to be served the second it comes out of the oven because it begins to deflate as soon as cold air hits it.

I found a recipe in a Gourmet cookbook and it looked like it would be pretty easy.  I've been using the same recipe ever since.

Chocolate Souffle

2 tablespoons butter
2 (1 ounce) squares of unsweetened chocolate, chopped roughly
2 tablespoons flour
1/2 teaspoon salt
1/3 cup sugar
2 tablespoons quick tapioca
2 cups milk
1/8 teaspoon gound mace
3 eggs, plus 1 egg white

Heavy cream for whipping

You must have a double boiler of some sort for this.  I use a sauce pan with a metal bowl set on top. 

Put about 1 inch of water in the bottom of a sauce pan and bring it to a simmer.  In a metal bowl, that will sit on top of the sauce pan, add the chopped chocolate and the butter.  Set the bowl on the sauce pan and allow the chocolate and butter to melt together.  Do not let the bowl touch the hot water.

 
Stir until well blended.


Mix the flour, salt, sugar and tapioca together.


Add the flour mixture to the chocolate mixture to make a thick paste.


Add the milk gradually and stir to combine.


Now you have to stir the mixture and cook it for about 20 minutes.  This is the only time consuming part, but it can be done a couple of days ahead of time.  Once the base is made you are set until just before it goes into the oven.  After about 20 minutes the mixture will get quite thick.  Remove from the heat and cool to lukewarm if you are going to continue, or cover and refrigerate until you are ready to proceed.


The next thing you have to do is separate your eggs.  You need 4 whites, but 3 yolks.  I just throw the extra yolk away, but you can save it if you have a way to use it.  You can do this part ahead of time too if you have room in your refrigerator to store the two extra bowls.  Make sure the whites go into a bowl large enough for whipping.  They will increase in volume quite a bit.


Preheat the oven to 325 degrees and butter and flour a round, high casserole or souffle dish.  Add the mace to the chocolate mixture.  Beat the egg yolks until thick and lemony.


Stir the egg yolks into the chocolate mixture.


Clean the beaters thoroughly.  Even a bit of egg yolk will keep the whites from whipping properly.  You want to beat the whites until you have stiff peaks.  Stir a small amount of the whites into the chocolate to lighten it.


After you have mixed the spoonful of whites into the chocolate, fold the chocolate into the remaining egg whites.


You fold by using a rubber spatula to cut across the middle of the mixture and down to the bottom.  Then bring the spatula up the side and over the top.  Turn the bowl 1/4 turn and repeat.  Do this until the chocolate is mixed in, but not so much that you have taken all the air out of the egg whites. 


Spoon the mixture into the prepared pan.  Place a larger pan in the oven and add about 1 inch of hot water.  Put the souffle into that pan and bake for 1 hour and 15 minutes.  Whip your cream and have everything ready.  You will serve it as soon as it is done cooking.  I took a picture, but it had already deflated a little by the time I got the camera.  It doesn't affect the taste when it deflates, it just doesn't look as fancy. 


A souffle doesn't require expensive ingredients.  It does take a bit of work, but it is so impressive and very tasty.  There is only a little sugar in it as well, so it is a fairly healthy dessert.  Go ahead, give it a try.  One year my son decided he wanted a blueberry souffle for his birthday.  I gave it a try and it was terrific.  We also love to have cheese souffle for brunch.  Once you try one, you will likly get hooked.

Wednesday, October 10, 2012

Egg Bread and Sticky Buns (Challah and Schnecken)


Do you have a meal you remember fondly from your childhood? Something your Mom, Grandmother, or Aunt made? I sure do. My favorite meal growing up was my mother's chicken soup with matzah balls (we called them alkies) and her egg bread. There was no greater treat than walking into a house full of those smells. I grew up fascinated watching her make the dough and form the bread. I wish I could tell you her Challah bread recipe had been handed down from her mother, who learned it from her mother, etc. She did learn to make the soup that way, but not the bread. She took a cookbook out of the library when she was a young bride and found this recipe. She was never able to remember the name of the cookbook and never saw it again. She loved all of the recipes she tried. Thank goodness she wrote this one down. I wish I could credit the author, but this was about 50 years ago. I honestly don't know how much is the original recipe and method and how much my mother may have tweaked it over the years. All I know is that it is delicious!


This recipe is laid out in steps. First you proof the yeast, then you mix in some dry ingredients, then the eggs, butter and the rest of the flour go into the bowl. The original recipe makes 4 loaves of bread. I often cut it in half because my KitchenAid mixer isn't large enough to do the full recipe. I will mix up the full recipe,in a huge bowl I have, if I want to put some loaves in the freezer.

Since I use instant yeast and my dough hook, I just put in the dry ingredients from steps one and two, and then add the water from both steps. Then I add the rest of the ingredients from step 3. 
 
For today I cut this recipe in half. 

Step 1 - Combine and let stand:

1 cup warm water
2 teaspoons sugar
½ teaspoon ground ginger
4 pkgs (2 ¼ tsp each) dry yeast

Step 2 - In another bowl mix:

4 cups flour
1 cup dry milk (optional)
2 cups warm water
1/3 cup sugar

Step 3 - Add yeast mix to flour mix and beat. Add the following:

½ cup soft butter
2 teaspoons salt
4 eggs
4 cups flour


Knead the mixture with 1 cup or more flour until smooth and elastic, about 6 minutes. Place in greased bowl and cover. Allow to rise until doubled. 1 hour on the counter, or using the microwave rise method. I've seen this dough rise in 20 minutes if the conditions are right.


Punch the dough down and form into 2 large or 4 small braided loaves.  Since I cut this recipe in half,  for one loaf of Challah and one batch of sticky buns, I cut the dough in half and cut one half into 3 pieces to use for braids.

 
I find my braids look nicer if I start braiding in the middle instead of at one end.


Move the loaf to a cookie sheet, cover and allow to rise a second time.
 
 
 Brush with egg yolk mixed with a little water. You can sprinkle the loaves with poppy seeds or sesame seeds. Bake at 375 degrees F for 30 minutes or until golden brown. This Challah recipe continues to rise in the oven. Not all breads will do this.


If you are keeping Kosher and want to serve this with meat, leave out the dry milk and use margarine.

It is traditional to braid this dough, but you can form it into regular loaves, rolls or whatever shape you want. It holds a shape very well. I love to use this dough to make sticky buns. I used half of it today to do that very thing.

To make sticky buns you roll one quarter (half of what I made) of the above recipe into a large rectangle. I use my cutting board as a guide, but you want it to be about 12 inches by 18 inches. Remember, when rolling out bread dough it helps to let the dough rest for a minute or two here and there. The gluten will relax and it won't spring back on you if you let it rest.  


Spread softened butter all over the dough and sprinkle with some white sugar, brown sugar and cinnamon. I don't have specific measurements, but you don't want too much of anything. Otherwise they will just be sloppy. I probably use about 1/3 cup of each sugar and about 4 to 5 tablespoons of butter. I use about 2 teaspoons of cinnamon. If you like chocolate chips or raisins, sprinkle some of them on now.


 Then roll the dough up starting with a long end. Cut the dough in half, then cut each half in half. Cut each quarter into 3 pieces. You can put them straight into a pan if you just want cinnamon buns. If you want sticky buns, mix the following and pour it into the bottom of the pan before placing the buns on top.

Mix together in a bowl:

2 tablespoons corn syrup
¾ cup brown sugar, packed
6 tablespoons melted butter
chopped pecans, if you have them and like them.


Allow the sticky buns to rise until doubled and bake in a 350 to 375 degree oven for about 30 minutes, or until golden brown.


I wish you could smell my house right now.