Sunday, September 30, 2012

Picky, picky...picadillo!

I love picadillo.  My family, not so much.  Too bad for them, because I'm going to make things I love every now and again.  That's the advantage of being the cook.  They actually ate it last night without complaint.  Maybe we are making progress. 

Picadillo is a classic Cuban dish.  It is thought to be the forerunner of American Sloppy Joe's.  I don't know about that for sure, but I like it lots more than I like Sloppy Joe's.  It seems I like a lot of Cuban foods.  Black beans & rice, Cuban sandwiches, picadillo...hmmm.  Maybe I was Cuban in a past life??

There are a million and one variations of Picadillo (peek a dee yo).  It seems like every one claims it is the 'authentic' version.  I think you should make it the way you like it and just enjoy it.  It is a ground beef dish that can be served over rice or used as a filling in tacos, etc.  It is often paired with black beans and plantains.  I just go with the rice.  The thing that makes it unusual is that it has green olives and raisins in it.  Some recipes use capers in place of the olives.  I just love the salty/sweet combination.  Here is a pic of my basic ingredients.  I forgot to put the crushed red pepper flakes in the picture.
One medium onion, chopped
One bell pepper, chopped - I used frozen strips from my freezer that I chopped up
2 cloves of garlic, minced
1 to 1 1/2 lbs. ground beef
1/3 cup green olives, chopped
1/4 cup raisins
1 or 2 (depends on how much meat) 8 oz. cans tomato sauce or 1 can diced tomatoes (I prefer the sauce)
2 tablespoons vegetable oil
1 teaspoon ground cumin
1 teaspoon oregano
1/2 teaspoon cinnamon
dash ground cloves
crushed red pepper flakes to taste
salt and pepper to taste
Hot cooked rice for serving
Hot sauce to taste at the table
 
Start by heating the oil and cooking the onions, garlic and peppers until they soften.
 
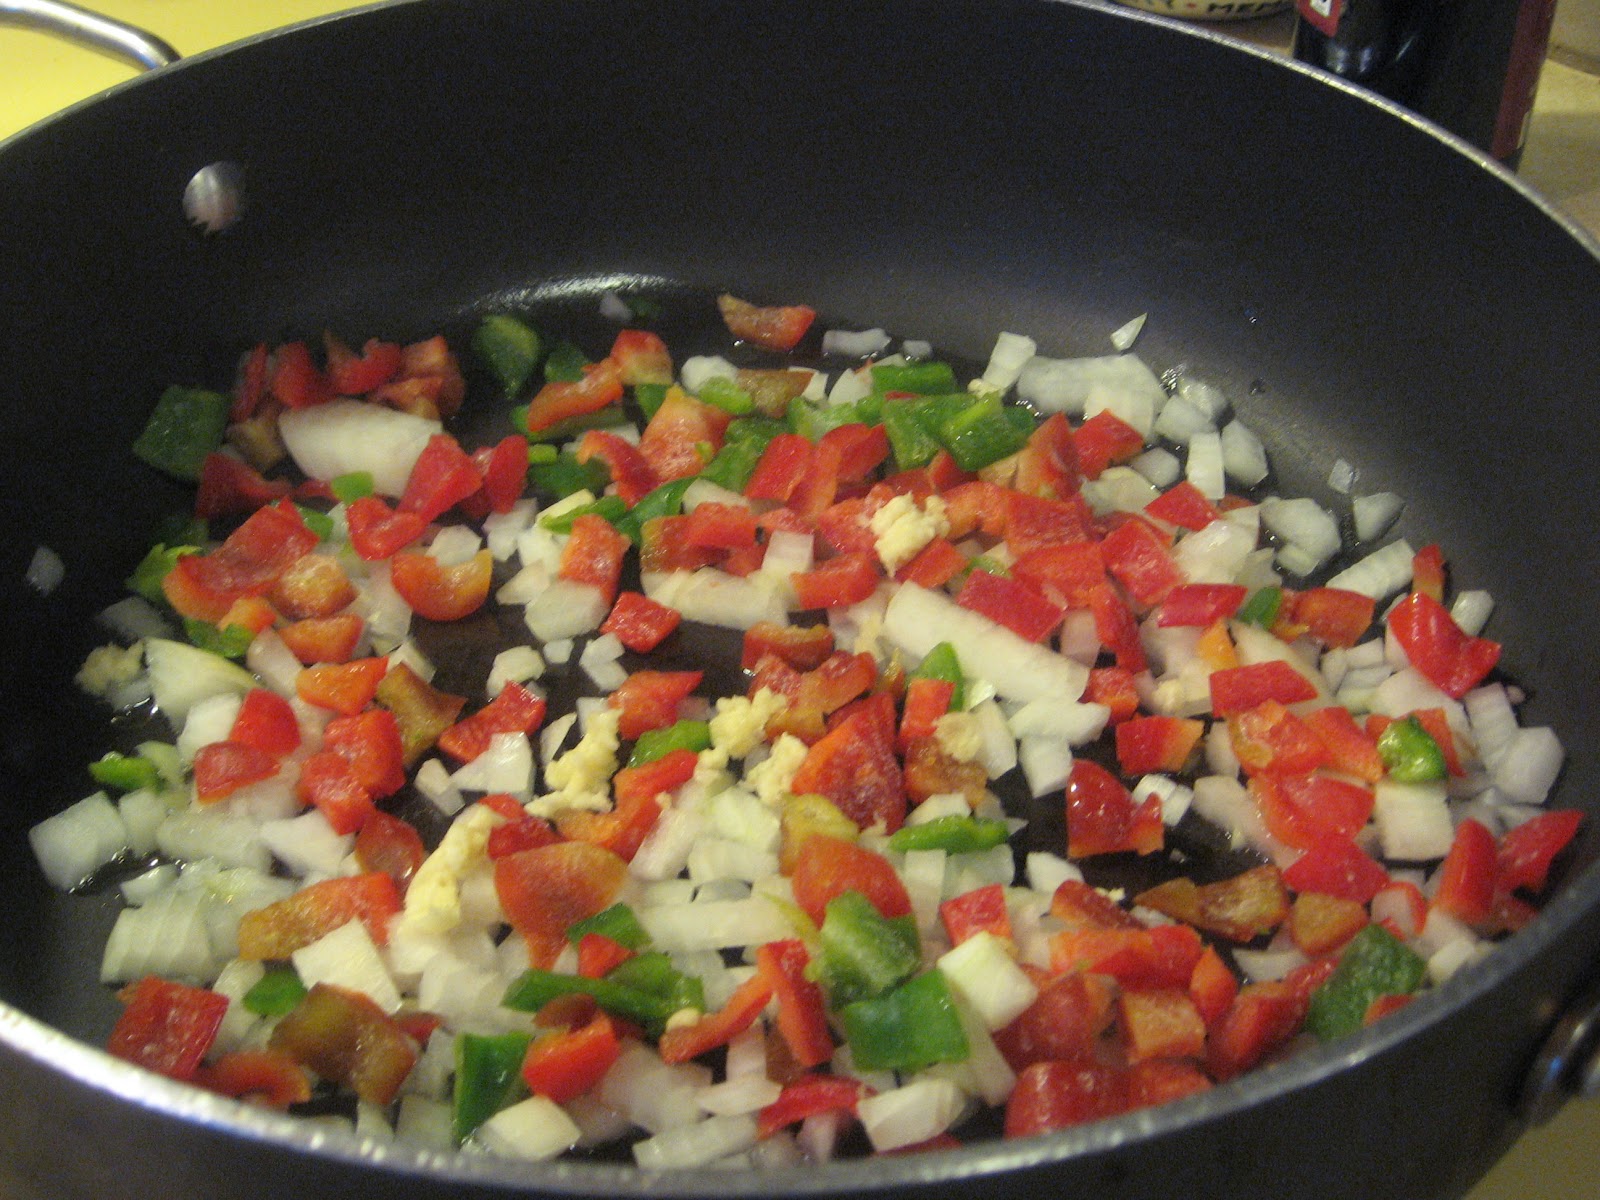
Add the ground beef and cook until brown.
 
When it is browned, drain the fat and add the chopped olives, tomatoes or tomato sauce and spices.
 
Simmer for several minutes and then stir in the raisins.  Check the seasonings and adjust the salt and pepper and red pepper flakes to your taste.  As you can see, I used diced tomatoes this time.  I didn't have any cans of tomato sauce in the pantry.  I just like the flavor better when I use the sauce and my daughter doesn't pick tomato chunks out when I use the sauce.

When it suits your taste, serve over rice and enjoy!  Don't forget to add some hot sauce at the table, if you like it spicier.  Of course, you can adjust everything to suit your tastes.  Look up recipe for Picadillo and see what other people do.  Adjust it to flavors your family may like.  Have some fun!
 
 
Do you make your own rice, or do you use instant stuff?  It really is very easy to make perfect rice with just a sauce pan.  Add in the amount of rice you want and pour in twice as much liquid.  Use a pan large enough that it won't boil over as it cooks. I used 2 cups of rice and 4 cups of water.  This yields 4 cups of rice. 
 
Add 1/2 teaspoon of salt to the water and turn it on to high heat.  Allow it to come to a full boil and then set a timer for 3 minutes.
After 3 minutes are up, cover the pan, reduce the heat to low, and let it simmer for 15 minutes.  That's all.  Perfect rice every time.  My old electric stove burners heat up and cool down slowly.  When I set the timer to 3 minutes, I turn another burner on to low and move the pan to that burner when the 3 minutes are up.  That way it doesn't boil over on me once I cover the pan.  If you have a gas stove, you won't have any problem with the temperature cooling down quickly enough.
 
Once in a while shake things up and try something new.  You might love it, you might not.  I scan through recipes and try to pick things that have ingredients we like.  I don't care for dill at all, so that is a clue to not try THAT recipe.  Of course, sometimes I go out on a limb.  Sometimes dishes with ingredients I don't like turn out to be really tasty. 


Saturday, September 29, 2012

What a deal!

I work in a grocery store.  No, not a grocery store.  I work in THE grocery store.  Wegmans.  They were voted the #1 grocery store chain in the country.  I love them.

When I was at work the other day I spotted a discount sticker on some beef.  I went over to look and found a beef round roast marked down to $2.19/lb.  Guess what we had for dinner???  If you are concerned about buying discounted meats, don't be.  The only thing is you need to either cook it or freeze it the day you buy it.  If you freeze it, just make sure you cook it as soon as you defrost it.  I have been buying and using discounted meats for as long as I can remember.  We have never gotten a bad piece of meat, nor have we ever gotten sick. 

A number of years ago my husband was watching PBS while the kids were napping.  He saw Jacques Pepin making a pot roast on the show Julia and Jacques Cooking at Home.  When the kids woke up he drove to the store and bought the book.  He couldn't wait for me to make the roast and it was well worth the money he spent on the book.  The recipe called for white wine, instead of the typical red.  This recipe feeds 10, but can be modified for a smaller roast.

Jacques's Pot Roast

One 5 lb. piece beef bottom round, trimmed of fat.
1 1/2 tsp. kosher salt
1 tsp. freshly ground pepper
2 to 3 tablespoons oil
2 cups chopped onion, 1 inch square
1 large tomato cored & chopped (I've used a drained can of diced tomatoes)
2 bay leaves
1 tsp dried thyme
1 1/2 cups white wine (choose one you like to drink)
1/2 cup water
potatoes, pearl onions, turnips, carrots, and other veggies you like in pot roast.  Jacques likes turnips, onions, carrots and peas.
parsley to garnish (I almost never do this, but it is nice if you have parsley)

Preheat the oven to 300.  Season the roast with salt and pepper.  Brown the roast on all sides (I don't always do this).  Put in a covered casserole and arrange onion, tomato pieces, bay leaves, and thyme around it. 
 
Pour the wine and water over it, cover and cook for 3 to 4 hours.  After that time, take the pan out of the oven.  Ladel as much of the cooking liquid into a pan as you can, add the potatoes and other veggies (not peas if you like them.  Add those at the end.)  Cook for another 1 to 1 1/2 hours, adding in enough of the saved liquid as will fit.  Add peas during the last 5 minutes of cooking. 
 
Any additional liquid I have I will boil and reduce to pour over the sliced meats.
 
This is what the roast looks like when it is done cooking, without peas because I don't like them.
 
Remove your veggies and keep them warm in the oven.  Let the roast rest for 10 minutes or so before slicing.  You can thicken the cooking liquid if you want a gravy, or just use the reduced liquid for pouring over the slices of roast.  I like to serve the meat with horseradish or dijon mustard.
 
I actually prefer to make this dish in the crock pot.  I believe the extra long, slow cooking is what this dish really need for perfect flavor.  I just didn't have time to do that yesterday.
 
Give the white wine and thyme a try.  It really is wonderful!
 
Does that dinner look like a bargain basement dinner?  No, it does not!


Thursday, September 27, 2012

These are a few of my favorite things...


I love music. I'll probably make a number of references to music over time. I can't help myself.

This post is about some of my favorite things to use when cooking for my family. I have been collecting utensils, appliances, and gadgets for a long time. You would be amazed what you can pick up at garage sales, Goodwill, and estate sales. Not to mention the gift factor. I have wonderful family and friends who know how much I love kitchen things. I understand not everyone has these thing or can afford to run out and buy these thing. Keep an eye out at sales and drop hints for gift giving. You won't be sorry. I was just delighted when a young mother I work with told me she had won a drawing and got to pick a gift. She was thinking about a slow cooker and wanted my opinion. Slow Cookers are one of my very favorite things!

I'm lucky in that I now have two Crock Pots. I've had a large one for years, but my sister gave me a small one that had belonged to her Mother-in-Law. The small one also came with a bread-baking insert. The insert had never been used when I got it, but I've used it and it works great. I honestly don't know if they still make them. I know some are available on E-bay, but I wouldn't go that route. There are other ways to make bread and cakes in a Crock Pot. If you find one at a garage sale, go for it. Otherwise, I'll show you how to make do.

These are my Crock Pots and some of the pans I use with them. One is the bread-baking insert. One is a small spring-form pan and the other is just a small cake pan. I picked up the small spring-form pan years ago to use in my pressure cooker. I still use it in that, but it's great in the Crock Pots too. The small cake pan came from a set of pans meant for making wedding cake. I got the set at a garage sale when I was in my 20's. I don't have any intention of making wedding cakes, but it is nice to have an assortment of cake pans to use.
 

I think most people think about using slow cookers to make soups and stews. They are great for that, but they can do much more as well. You can bake, steam, braise and all sorts of stuff. One of my favorite meals is baked beans and steamed brown bread. I can make the beans in the large Crock Pot and the brown bread in the small one. I'm going to share my brown bread recipe with you. It goes great with soups, stews, roasts, and just about anything else you can think of.

Brown Bread has a long New England history. Wheat production didn't take off well in New England at first. Corn meal and rye flour were more available than wheat flour. Brown bread developed as a way to stretch the supplies of wheat flour. The bread is also made with molasses, which was the less expensive sweetener used commonly in the colonial world. Since much of the cooking was done in a fireplace, methods developed to cook baked goods without an oven. This is where steamed breads and puddings come in.

When making recipes like this, I try to keep in mind that colonial housewives didn't always have the same items on hand and they learned to substitute and adjust. If I don't have wheat flour, I use white. If I have less corn meal, I use more rye flour. As long as the totals equal the correct amounts, I find the bread comes out well. You do need some cornmeal though. It just isn't right without it.

Boston-style Brown Bread

1 cup all purpose flour
1 ½ cups of combined wheat and rye flour
½ cup cornmeal
½ teaspoon salt
1 teaspoon baking soda
1 teaspoon baking powder
1 cup buttermilk (you can mix plain or vanilla yogurt with milk to 1 cup)
3 tablespoons melted butter
2/3 cups molasses (blackstrap, not sorghum)
1 ¼ cups raisins

1 to 2 cups of water for steaming.

Mix the dry ingredients together in a bowl. Mix the buttermilk, molasses and melted butter in another bowl. Add liquid ingredients to dry ingredients until just mixed. Fold in raisins. Put the mixture into a buttered pan or coffee can. Butter a piece of foil and put it on the top of the pan. Make the piece large enough that you can tent it while still sealing the pan well. The bread will rise and needs room to grow. I use a large rubber band to secure the foil to the top of the pan. String will work too. Place a trivet or crumpled foil in the bottom of the slow cooker. Add the water and place the pan on the trivet/foil. Put the cover on the slow cooker and cook on high for 3 hours. Insert a knife to check to see if it is done. If it isn't done, cover again with foil and let it cook for another 40 minutes. Check again.

I have a small trivet that came with the bread-baking pan. Before I had that I just used foil crumpled in the bottom of the slow cooker. There really isn't any need to buy a trivet if you have foil.
This is the bread-baking pan and the trivet.  You can see how nicely it fits in either slow cooker and how the pan sits on top of it.


This is what I mean by using foil instead of a trivet.


If you happen to have a pressure cooker this same recipe can be cooked in the pressure cooker on medium pressure for 65 minutes.

Slow cookers and pans can be used to make things like meatloaf, cakes, custards and all sorts of goodies. Crockpot365.blogspot.com is an awesome blog. Stephanie O'Dea has incredible ideas and recipes for using slow cookers. She taught me how to make granola and yogurt in my slow cooker. Take the time to look through her site. You won't be sorry.

The really nice thing about a slow cooker is that it works beautifully cooking tougher, cheaper cuts of meat. I also depend on it to provide hot meals for my family on nights when I have to work through dinner time. It is also nice on days when I'm at work all day and too tired to cook when I get home. I can prepare everything the night before and just dump it in the cooker in the morning and head to work. When I get home I set the table and we eat. I don't tend to cook rice or pasta in my slow cooker. I find they get too mushy. However, both can be cooked in advance and reheated easily to stir in when I get home. They also cook pretty quickly and I can do that just before dinner. A slow cooker give me so much flexibility. If we get home late it is no big deal. If we all have to eat at different times, everyone can serve themselves.

I'm not cooking today. We have an bunch of left-overs to heat up. Dig out your slow cooker if you have one. Check out Stephanie and try something new. I think you'll be pleasantly surprised.


Tuesday, September 25, 2012

Howdy!

Hi folks. I decided to start blogging because I love to cook and I love to share.  We are on a tight budget though, and that leads to some real creativity in the kitchen.  I'd like to share some of my tips and dishes with you.

The economy is tough for many of us.  A huge number of people are living on the edge financially.   Finding ways to save money is essential.  A very easy way to cut back is to learn to cook.  Processed foods are not economical and they aren't terribly healthy.  I do use some items that are processed, like spaghetti sauce.  I make my own too, but sometimes that isn't going to happen.  It is very handy to have some things in the cabinet that can help you to put a meal on the table quickly, but you should try to cut back on the amount of processed foods you buy and use.  Your pocketbook and your health will thank you.

This week we ran out of money on Monday and had to make it through until Thursday.    We had to pay for school pictures and stuff like that.  You all understand, I'm sure.  I have things in the refrigerator and freezer, so that isn't a big deal.

Tonight I had 2 boneless skinless chicken breasts to work with.  A neighbor moved from NY to CA and gave us some stuff from her cabinets that she didn't want to throw out.    One item was a box of Uncle Ben's Long Grain and Wild Rice.  I don't usually buy processed foods, but I'll use them if they are free.  Add a little extra rice, some veggies and we have dinner.  It is sort of like Arroz con Pollo, but not really. 
Here are the basic ingredients:  I had one box of rice mix, one cup of rice, one cup of peas, 4 1/2 cups of water with some chicken base mixed in.  I didn't have any chicken stock, or I would have used that.  I also diced an onion, minced 2 garlic cloves, diced some bell pepper strips from my freezer and sliced a few mushrooms that needed to be used up. I cut the two chicken breasts into cubes that were about one inch square.

I heated some oil (about a tablespoon) in a pan and browned the cubed chicken breast.  I put the chicken in a bowl to add back in at the end with the peas.  Then I added the chopped veggies, without any additional oil.
Here is the chicken, after I cooked it.
I didn't over-cook the chicken.  I wanted it cooked through, but I didn't want it to get tough.  One problem with chicken breast is that it has a tendency to get tough or rubbery when cooked too long or at too high a heat.

I cooked the veggies until the onions were translucent (see through).  Then I added the rice, rice mix, seasoning packet and water.  I added some additional salt & pepper and some Mrs. Dash Extra Spicy.  I followed the package directions and brought it to a boil, covered, reduced heat to low, and let it simmer for 25 minutes.
When the timer went off I added the cooked chicken back to the pan with the peas.  I didn't bother to defrost the peas.  I stirred it up and added a bit of water because it was starting to stick to the bottom.  I covered the pan and let the chicken and peas warm while we set the table.  Here is the finished dish.
After picking out the mushrooms my son declared, "Dinner was wonderful!"  High praise, indeed.

The beauty of cooking for yourself is that you can customize it based on what you like and what you have.  If you don't like things spicy, leave out the Mrs. Dash.  If you don't have or don't like mushrooms, use what you have and like.  Carrots or celery would have been just fine.  I usually take it easy on the salt when I'm cooking.  It is easy to add more at the table, but you can't take it out.  If I didn't have the Uncle Ben's package, I could have used an additional cup of rice and I would have added some seasoning, like thyme.  Start with flavors you know you like, or with things you have in the cupboard.  I happen to like thyme with chicken and eggs.  You could use basil, or herbs de provence too.  Whatever you want.  This dish would have been nice with cubed pork or tofu as well.

Thanks for spending a few minutes with me today.